TicTacLightsNanoEnglish: Difference between revisions
ArneRossius (talk | contribs) No edit summary |
ArneRossius (talk | contribs) No edit summary |
||
| Line 23: | Line 23: | ||
* [[:Image:tictaclights-nano-rev1.png|Schematic]] (PNG) | * [[:Image:tictaclights-nano-rev1.png|Schematic]] (PNG) | ||
* [[Media:TLN1_Main.zip|PCB layout for main board]] (Gerber/Excellon) | |||
* [[Media:TLN1_PD.zip|PCB layout for power/data board]] (Gerber/Excellon) | |||
* [[Media:tictaclights-nano-instructions-rev1.pdf|Construction kit instructions]] | * [[Media:tictaclights-nano-instructions-rev1.pdf|Construction kit instructions]] | ||
Latest revision as of 12:37, 4 January 2018
| project overview | |

| |
| Year | 2016 |
| Number of pixels | 144 |
| Grayscales / Colors | 8 Grayscales |
| Illuminant | SMD LEDs (size 0603) |
| Power input | 300 mW |
| Contact person | Arne Rossius |
| Project website | |
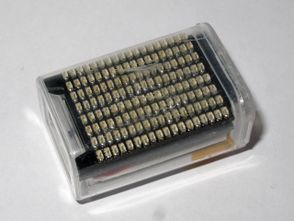
TicTacLights Nano is an extremely very small BlinkenLights|BlinkenLights clone which fits inside a mini TicTac box (usually sold at airports and on cruise ships as part of a huge box containing many mini TicTac boxes). It has all the features of the TicTacLights with the addition of an integrated lithium-polymer rechargeable battery and integrated charging circuit (using power from the Micro-USB port). Alternatively, the project can also be powered directly from the USB port.
This project uses the BlinkenPlus firmware on an ATmega8515 controller.
Hardware
The hardware is split onto two stacked PCBs, the main board and the power/data board. The main board (4 layers) contains the LEDs, the microcontroller and the associated transistors and passives. It also contains the Micro-USB connector for mechanical reasons. The power/data board (2 layers) contains the USB to UART bridge IC, the voltage regulator and battery charger IC as well as the MicroSD card slot. The two boards are connected through a 1.5 mm high fine-pitch connector.
Rev. 1
- Schematic (PNG)
- PCB layout for main board (Gerber/Excellon)
- PCB layout for power/data board (Gerber/Excellon)
- Construction kit instructions