SimpleClockEnglish
| project overview | |

| |
| Year | 2018 |
| Number of pixels | 58 |
| Grayscales / Colors | 2 |
| Illuminant | rectangular LEDs |
| Power input | |
| Contact person | Arne Rossius |
| Project website | |
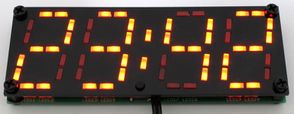
The SimpleClock is a 4-digit digital clock using an absolute minimum of components. The display consists of 58 red LEDs (2 per segment), connected to an 8-pin ATtiny13 microcontroller. The mains frequency is used as a time base, hence an AC-AC adapter (transformer) is required to power the clock. If a DC source is used, the time will stand still and the colon won't flash.
Hardware
The LEDs are driven using a technique called "CharliePlexing Plus", explained in Tim's Blog. For the LEDs connected between an I/O pin and GND or Vcc, two LEDs must be connected in series for this technique to work. For the LEDs between I/Os, two LEDs are connected in parallel (and another two anti-parallel) to get 2 LEDs for every segment.
The internal resistance of the microcontroller's output pins is used for current limiting. As the ATtiny13 has some "weak" and some "strong" pins, the strong pins use external resistors to increase their resistance to match the weak pins.
The series and parallel connections result in different currents per LED. This is compensated for in software by turning on the LEDs with lower currents for a longer time, so all segments light up with the same brightness.
The reset pin on the ATtiny13 has been reconfigured as an input for the timebase signal. The AC input voltage is fed to this pin through a low-pass filter. As the AC input voltage is unregulated, a diode clips it so it can't rise above Vcc (which would put the controller into high-voltage programming mode).
- Schematic (image)
- Schematic (EAGLE 4.x)
- PCB layout (EAGLE 4.x)
- Front bezel (DXF for laser cutting)
- Construction kit instructions Rev. 1.1
Firmware
The firmware for the ATtiny13 is written in assembly language. There is an option for 50 Hz or 60 Hz mains frequency. Please note that after setting the fuse bytes, the controller can only be programmed in an HVSP compatible programmer ("high voltage serial programming", using +12V on Reset pin), a standard ISP programmer won't work.
Setting the Time
To set the time,
- push and hold the button until the hours digits start flashing
- push the button for a short time several times until the hours are correct
- push and hold the button until the minute 10s digit starts flashing
- push the button for a short time several times until the minute 10s are correct (the minute 1s are reset to 0 every time the button is pushed)
- push and hold the button until the minute 1s digit starts flashing
- push the button for a short time several times until the minute 1s are correct (the internal seconds counter is reset to 00 every time the button is pushed)
- push and hold the button until the display stops flashing
Photos
More photos at http://arne.blinkenarea.org/SimpleClock/gallery.htm